Picture
Do you know Halloumi? Did you ever try?

If you answer the above questions with 'Yes', then I know that you love Halloumi and you will like my collection of delicious and healthy Halloumi recipes.

If you answer the above questions with 'No', then I want to invite you to get to know Halloumi and discover how many different dishes you can prepare in a fast and easy way with LetsEat's collection of the Halloumi recipes.

What is Halloumi Cheese?

Picture
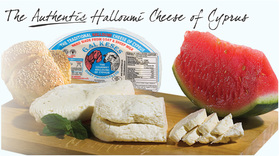
Halloumi is a traditional cheese from Cyprus, the island in the Mediterranean Sea.

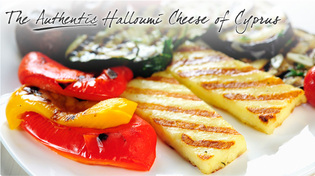
Halloumi cheese has a higher melting point than other cheese what makes it suitable cheese for grilling and frying. You almost won't find any BBQ in Cyprus without the use of halloumi.

Sometimes you might also come across haloumi cheese or hallomi cheese, which is the same and refers to Halloumi too.

It is also very common in warm months, to eat halloumi together with watermelon. The juicy slices of the watermelon are quite refreshing while the slices of halloumi give the delicious taste.

Halloumi is also one of the dishes that are usually served within a Cyprus Meze and very often you also will see a few slices of halloumi accompanying a cold beer ordered in a taverna.

Picture
Halloumi, Hallomi or Haloumi Cheese?

Halloumi is produced worldwide nowadays, although its origin is in Cyprus and the East Mediterranean. Within the US halloumi is registered as a protected cypriot product. The reason for not being registered within the EU is to find in a dispute between dairy producers and sheep and goat farmers about the percentage of cow's milk allowed to be used, if any.

In Canada halloumi is registered as hallomi without the 'u' cause of a difference with a local dairy producer.

Haloumi Cheese, with only one 'l' is just one of the typical typing errors for Halloumi Cheese.

Halloumi-crumbed chicken breast Recipe
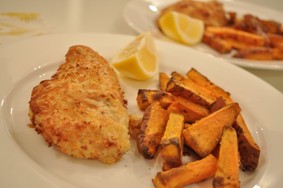
Picture
serves 2
  1. 80g halloumi, finely grated
  2. 2 tsp lemon zest
  3. 2 tbsp bread crumbs
  4. 2 chicken breast fillets
  5. 1 egg
  6. 1/3 cup flour
  7. salt and pepper
  8. vegetables to serve


  1. Mix the halloumi, bread crumbs and lemon zest together in a wide shallow bowl and season it with a little salt and pepper.
  2. In another bowl, whisk the egg.
  3. In another bowl, tip in the flour.
  4. Crumb the chicken fillets by dipping them in the flour bowl. Shake off the excess then dip them in the egg. Let the excess egg drip off and then place them in the final bowl – the halloumi crumb. Press them in firmly so they’re well coated.
  5. Pre-heat the oven to 180C fan-forced.
  6. Heat a little oil in a frying pan and cook the chicken for 2 minutes on each side until it is browned.
  7. Transfer the fillets to a lined baking tray and cook them for a further 15 minutes or until cooked through.
  8. Serve the chicken with vegetables or salad.


Tired of the usual ketchup and mustard? Give these regional and international toppings a try!

Picture
South-Western Hot Dog Toppings: Refried beans Chipotle mayo Chopped cilantro
Picture
Hawaiian Hot Dog Toppings: Canned crushed pineapple Diced mango Red onion
Picture
Greek Hot Dog Toppings: Tzatziki Feta Chopped black olives
Picture
German Hot Dog Toppings: Sauerkraut Hot German brown mustard Sliced onion
Picture
BLT Hot Dog Chopped bacon Shredded lettuce Chopped tomato
Picture
Asian Hot Dog Toppings: Wasabi mayo Pickled ginger Sliced scallions
Picture
Veggie Lover's Hot Dog Toppings: Corn relish Pickles Chopped zucchini and yellow squash
Picture
California Hot Dog Toppings: Avocado Grated carrots Sprouts Green Goddess salad dressing
 

How to Make a Yummy Lemon Cheesecake that is Diabetic Friendly

Picture
Receiving a diagnosis of diabetes usually means a change in lifestyle and diet.  If you are like me--I have a terrible sweet tooth!--I had this mental image of all things sweet and good disappearing from my diet.  Imagine my surprise to discover this is not true.  In fact, doctors and nutritionists recommend eating fresh fruit.  And there are many ways to make delicious diabetic desserts.  As with all foods, we diabetics have to watch our portions and even more so with sweets.  Do not make this cheesecake and eat it all before bedtime!  But incorporated into a healthy diet, you should be able to enjoy it.  With its sugar-free ingredients and fresh fruits, it is healthy and tasty enough for anyone!

Picture
DIABETIC'S LEMON CHEESECAKE

1 1/4 graham cracker crumbs*
1/4 cup Splenda granular
1/3 cup butter, melted
1 pkg (3-oz) sugar-free lemon gelatin mix
2/3 cup boiling water
2 bars (8-oz each) light cream cheese
6-oz. lite/firm silken tofu
grated rind of 1 lemon
juice of 1 lemon
1 cup sugar-free frozen whipped topping, thawed
Fresh fruit of your choice, optional

Picture
In a small mixing bowl combine the graham cracker crumbs, Splenda, and melted butter until mixed together well.  Using the back of a large spoon, press the mixture on the bottom and up the sides of an 8-inch springform pan.  Chill the crust for about ten minutes.

In a blender container mix the lemon gelatin mix and the hot water; slowly add in the cream cheese and the tofu.  Continue to mix until smooth.  Pour the mixture into a large mixing bowl and add the lemon rind, lemon juice and the thawed topping.  Pour into the prepared pan, smoothing the top.  Chill for 4 hours or more.  Before serving garnish with more whipped topping and fresh fruit/fruits of your choice, if desired.

*If you cannot use crumbs made from graham crackers, make your crumbs from sugar-free butter cookies or sugar-free vanilla wafers.

Serves 12.

Enjoy!


Impress your friends/family/pub quiz team with these fascinating food facts.

Picture
WHY DO RICE KRISPIES SNAP, CRACKLE, POP?

Created similarly to popcorn, rice krispies are made by steamed rice (rice doesn’t have enough moisture in it before) being heated until the grain until the “pop” into crisped rice. thin and hollowed out walls, sealed areas inside where air pockets have formed. When cold milk is added the shift in temperatyure causes these weak walls to suddenly fracture and make the snap, crackle and pop


Picture
CARROTS WERE PURPLE, WHITE, RED AND YELLOW BEFORE ORANGE

Yes the lovely veggie was not always a bright and cheery orange colour. Centuries ago, as early as 900AD, in Afghanistan they were predominantly purple and yellow, with other colours appearing over the hundreds of years to follow as the carrot spread around the globe. It wasn’t until the 16th century that the orange carrot started to be cultivated in the Netherlands. A popular theory holds that the carrots were selectively bred to be orange to honour William of Orange, leader of the Dutch revolution against the Spanish, however there is no evidence to support this. Today you can still buy the other coloured varieties, though they’re far from the popularity of the orange version.


Picture
THE COLOUR ORANGE COMES FROM THE FRUIT

Which came first, the chicken or the egg? Nurture versus nature? Orange the fruit or orange the colour? Well we can answer that last one for you! The word “orange” evolved from the Spanish word “naranja” which itself evolved from the Sanskrit for orange tree, “naranga”. Before the 16th century, in English the colour orange was in fact called “geoluhread” aka “yellow-red”, seriously, we were that original. So there you have it, until we found the orange fruit, orange was just a weird shade of yellow and red.

Picture
DINNER USED TO MEAN BREAKFAST

Fancy confusing your friends and family? The English word for dinner comes from the old French “disnar” which means to “break fast”. Traditionally dinner (AKA “breakfast”) was the first and largest meal of the day, eaten at noon. A lighter meal (supper) was eaten later in the day. People eventually started to regularly eat a meal before dinner but rather than call this meal dinner (which meant “break fast”) they started calling it the literal English name, “breakfast”! Meanwhile the biggest meal moved later in the day until eventually a lighter meal was eaten at noon (lunch) and the evening meal became lunch. So yes, you start your day with breakfast and end your day with breakfast.

Picture
THE WORLD’S MOST EXPENSIVE COFFEE COMES FROM POOP

Kopi Luwak are coffee beans that come from the poo of a palm civet, a cat sized mammal mostly found in southeast Asia. The animals eat coffee berries and the beans come out the other end, keeping their shape. The coffee retails for around $160 per pound, making it the world’s most bizarre and expensive coffee. The real question is: who discovered civet poop made great coffee?

 
Picture
In my family, we have to make this pasta dish at least once a week simply because my boys, Dominic and Alex, absolutely love it. Believe me, although the recipe is for six people, there is never any left over for my chickens. This is not one just for the kids, though--it’s the ultimate boys’ dinner, which should be accompanied by a good cold Keo beer.
Pasta Bake with Pancetta, Rosemary, and Ground Pork


 6 Servings

Ingredients:6 tablespoons extra virgin olive oil
1 red onion, peeled and finely chopped
1 carrot, peeled and finely chopped
9 ounces pancetta, cubed
18 ounces ground pork
2 tablespoons freshly chopped rosemary
1 x 14 ounce can cherry tomatoes
Salt and pepper to taste
2 3/4 cups (11 ounces) penne rigate
4 large eggs
1/2 cup freshly grated Parmesan cheese

Directions:

1.In a large saucepan, heat 4 tablespoons of the olive oil and sauté the onion and carrot for 5 minutes until soft, stirring occasionally with a wooden spoon.

2.Add the pancetta with the ground pork and rosemary and cook, stirring continuously, until colored all over, about 5 minutes.

3.Pour in the tomatoes, season with salt and pepper, and cook over medium heat for an additional 15 minutes, stirring occasionally. Let cool to room temperature.

4.Meanwhile, cook the pasta in a large pot of boiling salted water until al dente. Drain and add to the meat sauce. Stir well and let cool.

5.Preheat the oven to 350°F.

Break the eggs into the pan of cooled pasta and sauce, then add the grated Parmesan. Mix together.

6.Brush the remaining oil over the side and base of an 8 1/2-inch round nonstick baking dish with sides about 2 inches deep. Pour in the pasta mixture and spread out evenly.

7.Cook in the center of the preheated oven for 20 minutes until crispy and set.

8.Once cooked, let rest for 5 minute--it will be easier to cut and serve, as the layers will hold together. 

Serve hot or cold.Enjoy!!!